Integration with your app
Merkur widget can be connected with any framework or library and we can use it with other languages like PHP, Python or Java of course. It uses REST/GRAPHQL API which has a predefined and extensible response body.
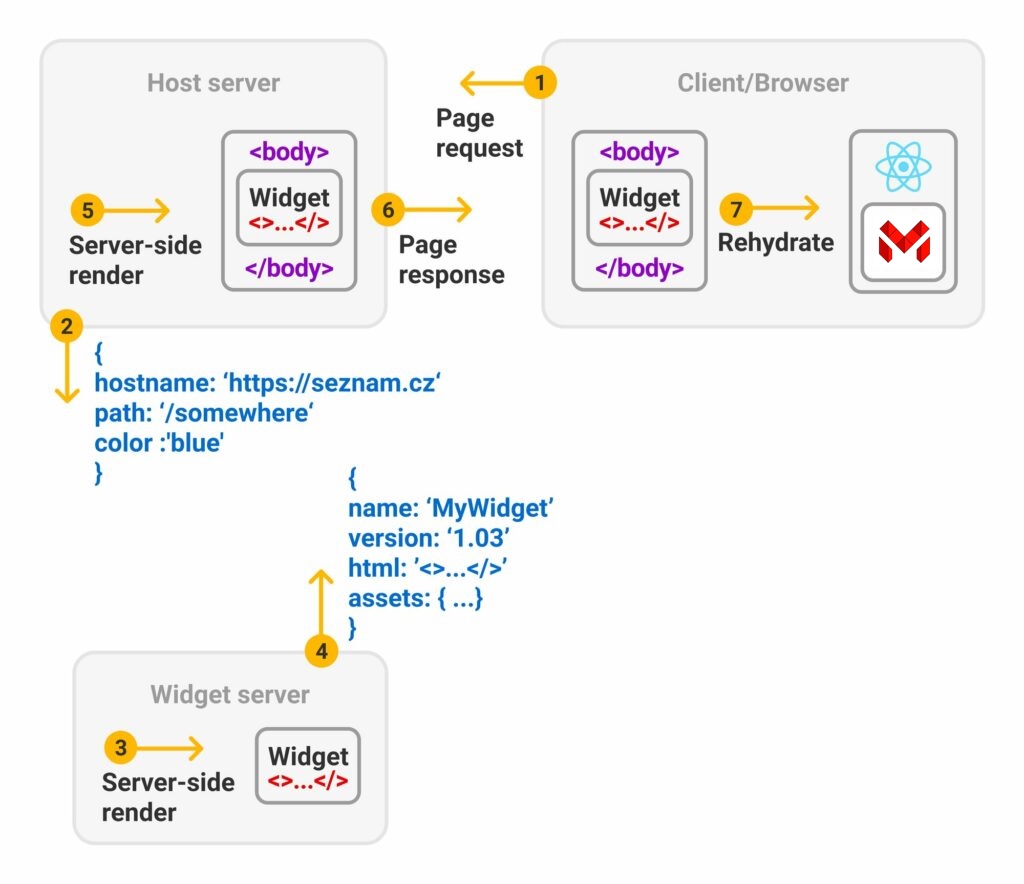
- The host application calls the Merkur widget API during server-side rendering. It passes all the information needed for the initial widget render as props.
- The widget initializes and performs its own server-side rendering.
- The Widget API returns the widget as a JSON-serialized object containing all data—widget name, version number, props, widget state, and especially the rendered HTML and references to scripts and styles.
- The host application includes the scripts, styles, and rendered HTML in the generated page code.
- In the browser, the widget is revived. Because widgets are named and versioned, multiple widgets can run on the same page simultaneously.
- The widget now runs inside the host application. Communication is possible via widget props (host => widget) and either native DOM events or Merkur events on the widget (widget => host).
API call for widget properties
At first we must make an API call with your framework of choice. In this example we will use the built-in browser fetch API. Feel free to choose yours.
// browser
(async() => {
  const widgetClassName = 'widget__container';
  const widgetProperties = await fetch(`http://localhost:4444/widget`)
    .then((response) => response.json())
    .then((data) => {
      /**
       * Set containerSelector for our widget. Can already come predefined
       * in widget response with some defaults, but it's usually overridden
       * on client, to allow for more control.
       */
      data.containerSelector = `.${widgetClassName}`;

      return data;
    });

  console.log(widgetProperties);
}();
{
"name":"my-widget",
"version":"0.0.1",
"containerSelector": ".widget__container",
"state":{
"counter": 0
},
"assets":[
{
"name": "polyfill.js",
"type": "script",
"source": {
"es9": "http://localhost:4444/static/es9/polyfill.31c5090d8c961e43fade.js"
},
"test": "return window.fetch"
},
{
"name": "widget.js",
"type": "script",
"source": {
"es11": "http://localhost:4444/static/es11/widget.4521af42bfa3596bb128.js",
"es9": "http://localhost:4444/static/es9/widget.6961af42bfa3596bb147.js",
},
"attr": {
"async": true,
"custom-attribute": "foo"
},
},
{
"name": "optional.js",
"type": "script",
"source": {
"es9": "http://localhost:4444/static/es9/optional.31c5090d8c961e43fade.js"
},
"optional": true
},
{
"name": "widget.css",
"type": "stylesheet",
"source": "http://localhost:4444/static/es11/widget.814e0cb568c7ddc0725d.css"
}
],
"html":"\n <div class=\"merkur__page\">\n <div class=\"merkur__headline\">\n <div class=\"merkur__view\">\n \n <div class=\"merkur__icon\">\n <img src=\"http://localhost:4444/static/merkur-icon.png\" alt=\"Merkur\">\n </div>\n \n \n <h1>Welcome to <a href=\"https://github.com/mjancarik/merkur\">MERKUR</a>,<br> a javascript library for front-end microservices.</h1>\n \n \n <p>The widget's name is <strong>my-widget@0.0.1</strong>.</p>\n \n </div>\n </div>\n <div class=\"merkur__view\">\n \n <div>\n <h2>Counter widget:</h2>\n <p>Count: 0</p>\n <button onclick=\"return ((...rest) => {\n return originalFunction(widget, ...rest);\n }).call(this, event)\">\n increase counter\n </button>\n <button onclick=\"return ((...rest) => {\n return originalFunction(widget, ...rest);\n }).call(this, event)\">\n reset counter\n </button>\n </div>\n \n </div>\n </div>\n "
}
Revive merkur widget in browser (SPA)
After we receive response body, we first create the widget container.
  const widgetContainer = document.createElement('div');
  widgetContainer.classList.add(widgetClassName);
  widgetContainer.innerHTML = widgetProperties.html;
After that we must download widget assets, insert widget container into DOM and revive our widget.
For downloading assets we can use the loadAssets method from @merkur/integration module.
npm i @merkur/integration core-js --save
Assets can have custom attributes defined in attr object. The only default attribute is defer, and you can override it by setting it as a custom attribute with the value false. Assets may also contain a test expression. If the test expression evaluates to false, the asset will be loaded. Assets that are not crucial for the application can be flagged as optional. Optional assets won't cause errors and will fall back gracefully.
The function loadAssets() accepts an array of asset objects and returns a promise that resolves to an array of results. Each result is the original asset object augmented with an element property, which is the corresponding HTML element (link/style for styles, script for scripts, and script of type application/json for JSON assets). If an optional asset fails to load, its element property will be null.
For JSON assets (with type: json/inlineJson), the JSON data can be accessed by parsing the textContent of the element using JSON.parse.
A full example of a Merkur widget integration into an SPA application:
import { loadAssets } from '@merkur/integration';
import { getMerkur } from '@merkur/core';

(async() => {
  const widgetClassName = 'widget__container';

  // make API call to widget
  const widgetProperties = await fetch(`http://localhost:4444/widget`)
    .then((response) => response.json())
    .then((data) => {
      // define container selector for our widget
      data.containerSelector = `.${widgetClassName}`;

      return data;
    });

  // create widget container
  const widgetContainer = document.createElement('div');
  widgetContainer.classList.add(widgetClassName);
  widgetContainer.innerHTML = widgetProperties.html;

  // load widget assets
  const assets = await loadAssets(widgetProperties.assets);
  assets.forEach((asset) => {
    if (['json', 'inlineJson'].includes(asset.type) && asset.element) {
      const jsonData = JSON.parse(asset.element.textContent);
      console.log(`Loaded JSON asset ${asset.name} data:`, jsonData);
    } else if (asset.element) {
      console.log(`Loaded asset:`, asset);
    } else {
      console.warn(`Failed to load asset:`, asset);
    }
  });

  // insert widget container to DOM
  document.body.appendChild(widgetContainer);

  // create instance of merkur widget
  const widget = await getMerkur().create(widgetProperties);

  // alive merkur widget
  return widget.mount();
}();
If your application doesn't use npm modules, you can handle assets your own way and add onload method for script assets, where you will revive the merkur widget. A primitive example:
(async() => {
  const widgetClassName = 'widget__container';
  const widgetProperties = await fetch(`http://localhost:4444/widget`)
    .then((response) => response.json())
    .then((data) => {
      // added container selector for our widget
      data.containerSelector = `.${widgetClassName}`;

      return data;
    });

    // create widget container
    const widgetContainer = document.createElement('div');
    widgetContainer.classList.add(widgetClassName);
    widgetContainer.innerHTML = widgetProperties.html;

    // own very primitive handling widget assets
    widgetProperties.assets.forEach((asset) => {
      if (asset.type === 'script') {
        let script = document.createElement('script');
        script.onload = () => {
          __merkur__.create(widgetProperties)
            .then((widget) => {
              widget.mount();
            });
        };
        script.src = asset.es9.source;
        document.body.appendChild(script);
      }

      if (asset.type === 'stylesheet') {
        // insert to page similar as script tag
      }
    });

    // insert widget container to DOM
    document.body.appendChild(widgetContainer);
}();
Hydrate server side rendering widget (MPA)
After we receive response from the widget API call we must update the final HTML which is sent to the browser. First we add assets:
<html>
<head>
  <!-- load css -->
  <link rel='stylesheet' href='http://localhost:4444/static/es11/widget.814e0cb568c7ddc0725d.css'>
  <!-- ... -->
</head>
<body>
  <!-- widget container from API response -->
  <div class='widget__container'>
    ${widgetProperties.html}
  </div>

  <!--
    It's important to add widget's scripts after widget's html,
    because widget scripts need to access widget container from DOM.
  -->

  <!-- load scripts -->
  <script src='http://localhost:4444/static/es9/polyfill.31c5090d8c961e43fade.js'></script>
  <script src='http://localhost:4444/static/es11/widget.4521af42bfa3596bb128.js'></script>

  <script>
    // important part for hydration on client site
    __merkur__.create(${JSON.stringify(widgetProperties)})
      .then((widget) => {
        widget.mount();
      });
  </script>
</body>
</html>
Integration with React
For easy integration with React library we created the @merkur/integration-react module. The module is designed for both client-side and server-side use.
npm i @merkur/integration-react core-js --save
You can use your own application stack to make the API call for widgetProperties. You then pass widgetProperties from the API call result to MerkurWidget. The component then automatically generates div container with appropriate selector (currently only id and className are supported), based on the one defined in widget properties and takes care of all the hard work for you.
import React from 'react';
import { MerkurWidget } from '@merkur/integration-react';

// example in browser
const widgetClassName = 'widget__container';
let widgetProperties = await fetch(`http://localhost:4444/widget`)
  .then((response) => response.json())
  .then((data) => {
    data.containerSelector = `.${widgetClassName}`;
    return data;
  })

React.render(
  <div className="app">
    <MerkurWidget widgetProperties={widgetProperties}>
      <div>
        Fallback for undefined widgetProperties
      </div>
    </MerkurWidget>
  </div>,
  document.body
);
Children component(s) passed to <MerkurWidget /> are used as a fallback when the widget is not yet ready or an error happened. This can be used to display loading placeholders or error messages. To differentiate between loading and error states, pass a function as children.
return (
  <MerkurWidget widgetProperties={widgetProperties}>
    {({ error} ) => error ? <span>Error happened.</span> : <span>Loading...</span>}
  </MerkurWidget>
)
You can also react to component events through callbacks.
- When widget is mounted, a function passed through
onWidgetMountedprop is called with the widget instance. - Before the widget is unmounted,
onWidgetUnmountingis called. - Whenever error occurs during the widget lifetime, an
onErrorfunction prop is called. If theonErrorcallback returnstrue, the default error fallback will not be displayed, allowing you to handle the error with your own custom UI or logic.
return (
  <MerkurWidget
      widgetProperties={widgetProperties}
      onWidgetMounted={widget => this._widgetMounted()}
      onWidgetUnmouting={widget => this._widgetUnmounting()}
      onError={error => {
        console.error('Widget error:', error);
        // Return true to prevent showing the default error fallback
        // Return false or undefined to show the default error fallback
        return this._handleError(error);
      }}>
    <div>
      Fallback for undefined widgetProperties
    </div>
  </MerkurWidget>
);
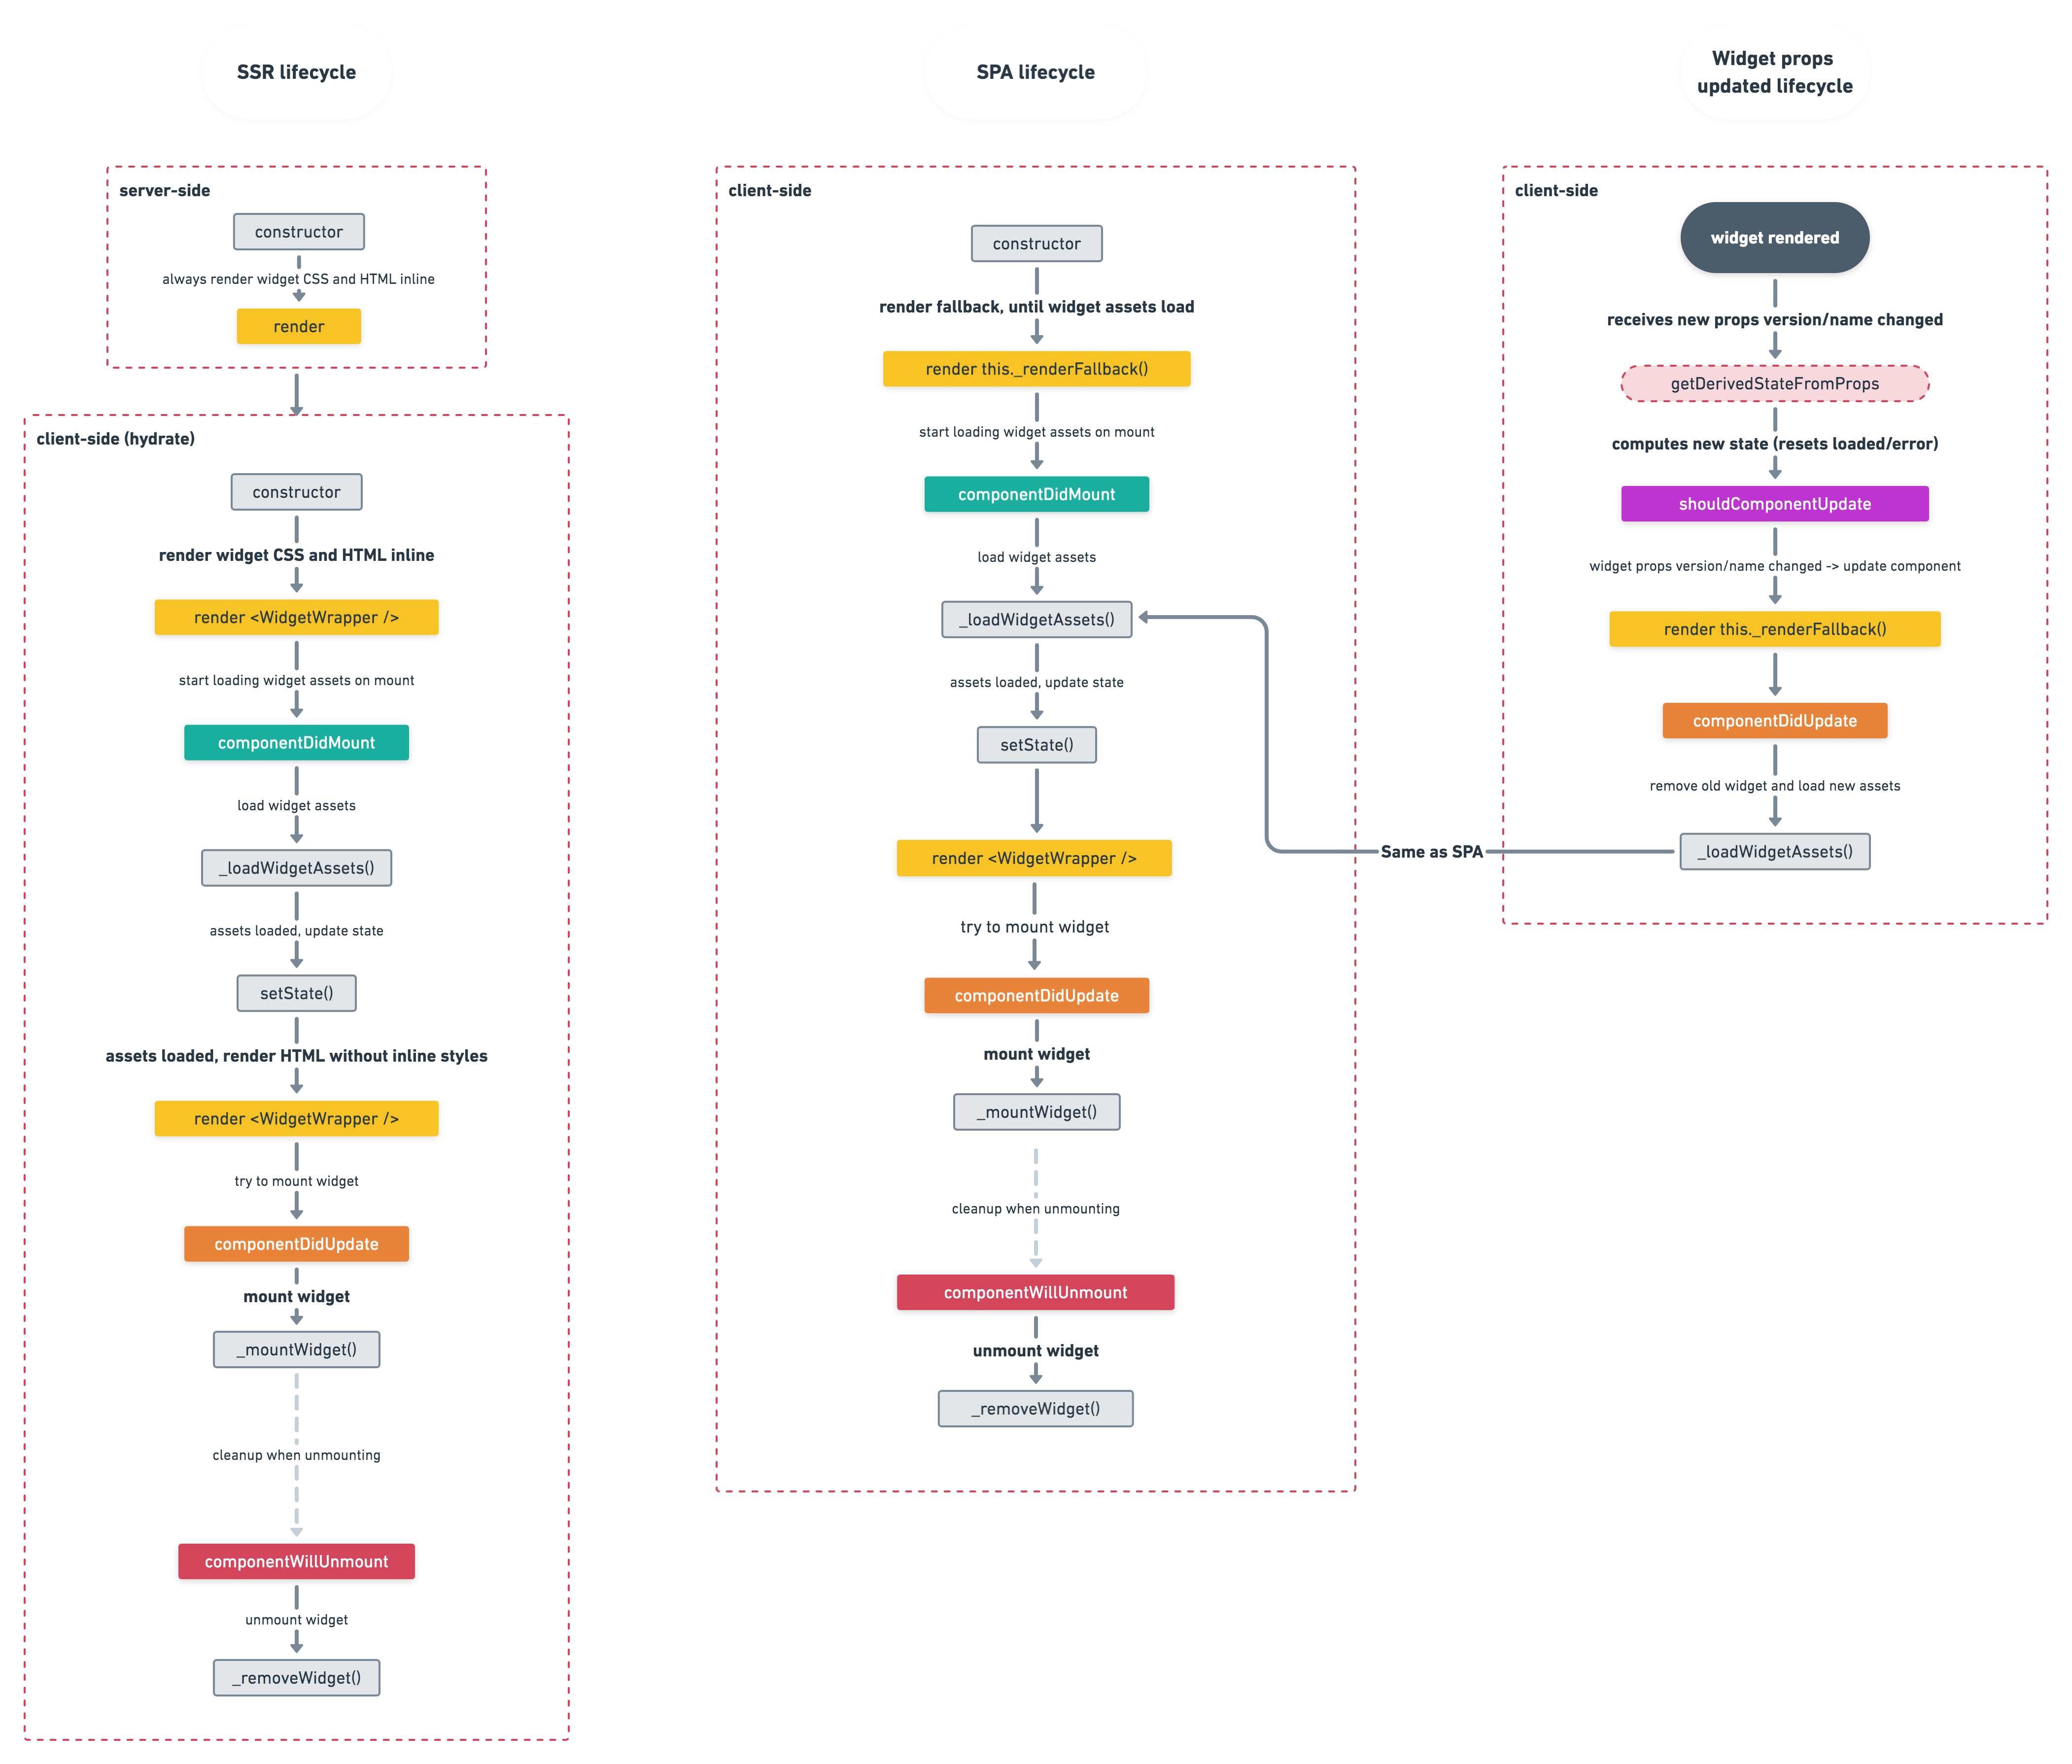
Below you can see visualization of how the react component handles synchronization with widget's own lifecycle.
If you have some problems with integration you can turn on debug mode which can be helpful for solving your problems.
return (
  <MerkurWidget
      debug={true}
      widgetProperties={widgetProperties}
      onWidgetMounted={widget => this._widgetMounted()}
      onWidgetUnmouting={widget => this._widgetUnmounting()}
      onError={error => this._handleError(error)}>
    <div>
      Fallback for undefined widgetProperties
    </div>
  </MerkurWidget>
);
Slots
There's also React component to handle Merkur slots - MerkurSlot. It has largely simplified api requiring only widgetProperties and slotName upon creation, where:
slotName- represents the name of the slot, fetched from the API, that should be rendered here.widgetProperties- the same widget properties passed to the main reactMerkurWidgetcomponent.
It also supports rendering of fallback (loader/error) the same way the main component does. However there's no error handling in this component, this means that you can still pass function as a children, but the received error object will always contain { error: null } no matter the situation.
The MerkurSlot component doesn't handle the widget's lifecycle the same way as the MerkurWidget does, this means that it's expecting that the MerkurWidget component is also used, which takes care of the widget lifecycle. MerkurSlot component can't be used on it's own without using MerkurWidget anywhere else in the React component tree.
return (
  <MerkurSlot
    slotName={'headline'}
    widgetProperties={widgetProperties}>
    <div>
      Fallback for undefined widgetProperties
    </div>
  </MerkurSlot>
)
Merkur Dev Client
When integrating Merkur widgets into an existing application, developers often face challenges with the development workflow - particularly with hot module replacement (HMR). The Merkur Dev Client solves this problem by bringing the same seamless development experience you get in the playground directly to your integrated application.
Bringing Playground Experience to Your Application
The Merkur Dev Client enables the same fluid development experience you enjoy in the playground environment when working with your widget in any integrated application:
- Real-time Widget Updates: Edit your widget code and see changes instantly in your application
- No Application Refreshes: Updates are applied without reloading the entire application
- Preserve Application State: Keep authentication, form inputs, and application context intact during development
Enabling the Dev Client
To enable the Dev Client in your host application, simply add the following script tag to your HTML head:
<script src="http://localhost:4445/__dev__/js/merkurDevClient.js"></script>
For server-side templates (like EJS), you can conditionally include it only in development mode:
<% if (process.env.NODE_ENV === 'development') { %>
  <script src="http://localhost:4445/__dev__/js/merkurDevClient.js"></script>
<% } %>
How Dev Client Works
The Dev Client works by:
- Establishing a WebSocket connection to your Merkur dev server
- Monitoring changes to Merkur widget assets (scripts, styles)
- Automatically replacing or updating affected assets when changes are detected
- Hooking into the Merkur widget creation process to track active widgets within your application
Assets are tracked using the
data-merkur-asset-nameattribute, which the Dev Client uses to identify and update them without reloading the entire application page. The Dev Client is automatically configured when running your widget in development mode with the Merkur CLI (merkur dev), and only requires adding a single script tag to your host application.